Java开发的小伙伴一定都知道spring家族吧,spring家族是一个庞大的家族,发展到现在Java已经有点离不开spring家族了,spring家族这几年有了个新伙伴,叫springboot,这个新伙伴集spring之大成,可以说是非常厉害了,今天小编就和大家说说如何使用springboot这个新伙伴。
首先呢,我们要先了解一下,springboot是什么?
Spring Boot是由外国Pivotal团队提供的全新框架,其设计目的是用来简化新Spring应用的初始搭建以及开发过程。该框架使用了特定的方式来进行配置,从而使开发人员不再需要定义样板化的配置。通过这种方式,Spring Boot致力于在蓬勃发展的快速应用开发领域(rapid application development)成为领导者。概念
但从根本来说的话,Spring Boot就是一些库的集合,它能够被任意项目的构建系统所使用。为了方便,Spring Boot也提供了命令行界面,它可以用来运行和测试Boot应用。框架的发布版本,包括集成的CLI(命令行界面),都可以在Spring仓库中手动下载和安装。
这里讲解如何使用 idea 快速搭建 Spring Boot项目
第一步:新建 Spring Initializr 项目:
1.选择 Spring Initializr

2.选择 SDK,点击【new】这里就是使用 JAVA SDK 要求版本 1.8+,选择你默认安装在 C:Program FilesJavajdk1.8.0_191 目录:

3.然后选择默认的 url (不用管)点击【Next】:

4.填写项目信息:

5.先勾选上 Web 依赖:

6.勾选 SQl 下的 MySQL,MyBatis 依赖,根据自己的项目需要依次添加,可以追加。

7.选择好项目的位置,点击【Finish】:

8.如果是第一次配置 Spring Boot 的话需要等待 IDEA 下载相应的 依赖包,默认创建好的项目结构如下:
SpringbootApplication: 一个带有 main() 方法的类,用于启动应用程序
SpringbootApplicationTests:一个空的 Junit 测试了,它加载了一个使用 Spring Boot 字典配置功能的 Spring 应用程序上下文
application.properties:一个空的 properties 文件,可以根据需要添加配置属性
pom.xml: Maven 构建说明文件

第二步:开始编写一个简单项目
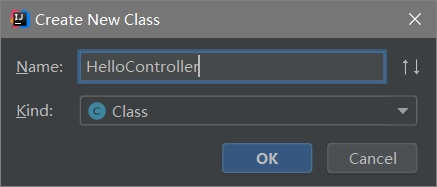
在 【main/java/com.xpwi.springboot】包下新建一个【HelloController】:
package com.xpwi.springboot;import
org.springframework.web.bind.annotation.RequestMapping;import
org.springframework.web.bind.annotation.RestController;
/***
测试控制器
*/
@RestController
public class HelloController{
@RequestMapping("/hello")
public String hello() {
    return "Hello Spring Boot!";
    }
 }
第三步:开始启动 Spring Boot
1.回到 SpringbootApplication 这个类中,然后右键点击运行:

2.之所以在上面的项目中没有手动的去配置 Tomcat 服务器,是因为 Spring Boot 内置了 Tomcat
等待一会儿就会看到下方的成功运行的提示信息:

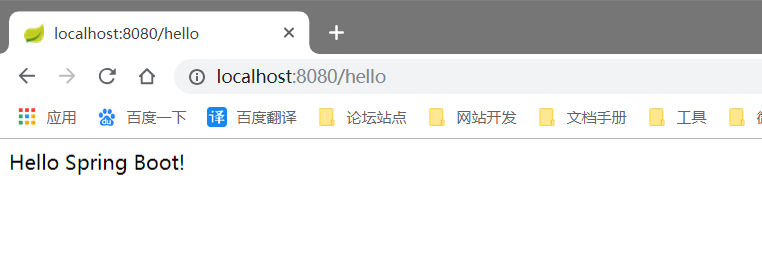
3.此时,就可以看到我们的 Tomcat 已经运行在 8080 端口了,现在便访问一下下面地址:
http://localhost:8080/hello
4.可以看到一个简单的springboot项目就成功了
以上就是如何搭建springboot的教程,更多相关内容请持续关注本站。